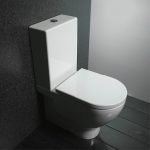
1. When buying a new pan, you will also need to buy a suitable connection piece for the waste outlet. They are push fit connections with multiple fins of rubber to make a watertight seal. There are several different shapes and angles available – angled, straight, offset and radii. Choice will depend on the existing pipe and its position in relation to the pan, as well as the size of the pipe itself. Be sure to take a note of the internal diameter of the soil pipe and the external diameter of the pan outlet. Also sketch out the measurements of the distance and offset of the two pieces.
2. Push the connector piece onto the pan outlet and move the pan into position with the connector going inside the soil pipe. Mark the fixing point of the pan on the floor. Remove the pan and drill and plug these if the floor is of a solid type. For wooden floors, simply drill a small diameter pilot hole for the screws. Remember to check there are no hidden pipes or cables running under the drill holes. Do not fix the pan yet, but line it up again ready.
3. Now, assemble the cistern with all its internal workings following the manufacturer’s instructions and connect it to the pan. This may be via a flush pipe, or the cistern may sit directly onto the pan. Look carefully at the assembly instructions since the correct mounting of all parts is important and may vary from manufacturer to manufacturer.
4. Ensuring that it is level, mark the fixing points for the cistern, lift it out of the way and drill and plug the wall. Reposition the cistern and fix. Note that you must use brass screws since steel ones will corrode in the vicinity of moisture. Generally, the screws are mounted through small rubber gaskets to prevent damage. Be careful not to over-tighten the screws as the ceramic cistern will crack very easily. If needs be, use some off-cuts of small diameter plastic pipe to pack the cistern out from the wall. If you are planning to tile the wall later, put in a couple of temporary packing pieces of wood the thickness of the tiles.
5. Now fix the pan to the floor. Again, use brass screws with rubber washers to prevent cracking the base of the pan.
6. Run the new cold water feed to the cistern and connect it to the ball valve as shown in the instructions. When running this feed, take the opportunity to fit a miniature stop valve in it so that the WC can easily be isolated at a later stage for maintenance. You’ll be pleased you did this if you get a leak when you switch the water back on.
7. Next, connect up the overflow pipe to the cistern. If you do not have an existing one, then a new one will need to be run. This should be 21 mm diameter and run from the cistern, out through an external wall. It should be sited so that an overflow of water will be readily noticed but not cause any damage. Remember that this outlet relies on gravity so it should travel downhill slightly.
8. Switch the water supply back on and check for leaks. The ball valve will need to be adjusted so that the cistern fills to about 20mm below the overflow outlet before stopping.


